اكتب ما تود البحت عنه و اضغط Enter
ads
معذرة، فالصفحة التي تبحث عنها في هذه المدونة ليست متوفرة.
‏إظهار الرسائل ذات التسميات جوجل. إظهار كافة الرسائل

الأحد، 29 أبريل 2018

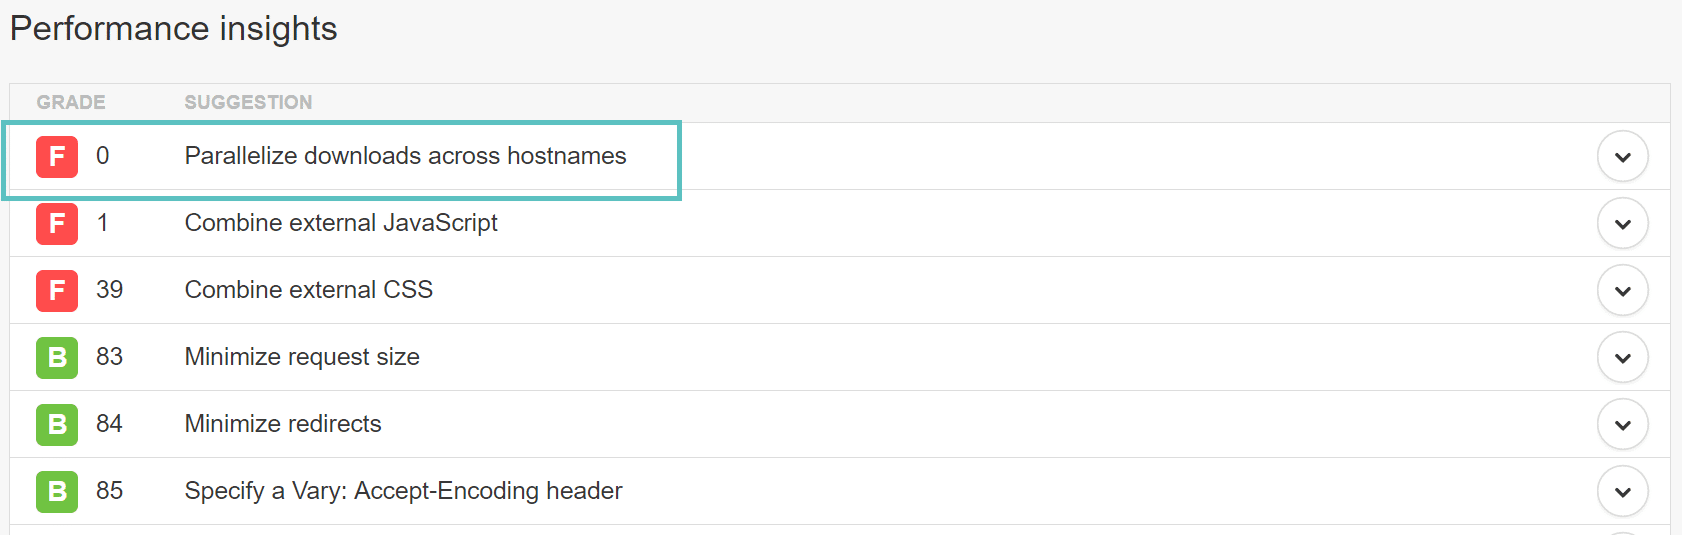
Seeing the “parallelize downloads across hostnames” warning in Pingdom, GTmetrix, or Google PageSpeed Insights? This is because web browsers are limited to the number of concurrent connections they can make to a host. This is mainly due do HTTP/1.1 in which browsers open on average 6 connections per hostname. This warning is typically seen on websites with a large number of requests. In the past, the only way to get around this limitation is to implement what they call domain sharding.


Note: If you are running over HTTPS with a provider that supports HTTP/2, this warning can usually be safely ignored now. With HTTP/2 multiple resources can now be loaded in parallel over a single connection.
Depending upon the tool or software reporting it, the warning might appear in a couple different ways:
  • “parallelize downloads across hostnames”
  • “increase download parallelization by distributing these requests across multiple hostnames”
pingdom parallelize downloads across hostnames
If you are still running over HTTP and haven’t migrated to HTTP/2 yet, you can follow the tutorial below on how to implement domain sharding. Again, most of the techniques are now considered deprecated. Over 77% of browsers now support HTTP/2 when running over HTTPS, as well as many CDN and web hosting providers, including Kinsta. It is also important to note that Pingdom doesn’t support HTTP/2 yet since it uses an older version of Chrome.

Fix “Parallelize Downloads Across Hostnames” Warning

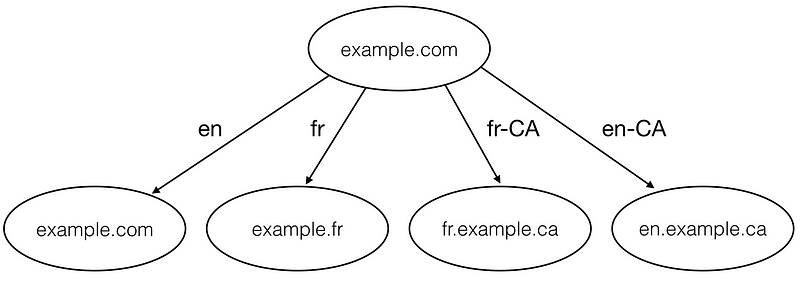
Domain sharding refers to spreading out your assets across multiple subdomains. By doing this you can multiply the number of simultaneous requests. Using domain sharding also gives you the ability to load content on cookie-free subdomains. However, it is also important to note that there are a couple drawbacks to this. By introducing additional subdomains you are adding more DNS requests which increases resolution times and you lose a lot of your caching benefits. Follow the steps below to set it up.

1. Setup Additional Subdomains

The first thing you will need to do is create additional subdomains and or CNAME records to spread across the request for your static assets. You can do this at your DNS registrar or if you are a Kinsta customer you can also edit your DNS records from within your My Kinsta dashboard. Typically no more than 4 are recommended. You will want to point your additional CNAMEs at your /wp-content directory. An example of a configuration might be:

domain.com
static1.domain.com
static2.domain.com

2. Edit WordPress Config

You then have to configure WordPress to parallelize the downloads across subdomains. Simply add the following code to your WordPress theme’s functions.php file (src: GitHub). And replace the $subdomains values with your subdomains. All subdomains/hostnames MUST have the same structure/path.

function parallelize_hostnames($url, $id) {

 $hostname = par_get_hostname($url); //call supplemental function

 $url = str_replace(parse_url(get_bloginfo('url'), PHP_URL_HOST), $hostname, $url);
 return $url;
}
function par_get_hostname($name) {
 $subdomains = array('media1.mydomain.com','media2.mydomain.com'); //add your subdomains here, as many as you want.
 $host = abs(crc32(basename($name)) % count($subdomains));
 $hostname = $subdomains[$host];
 return $hostname;
}
add_filter('wp_get_attachment_url', 'parallelize_hostnames', 10, 2);

 This same technique above can also be used with CDN providers such as KeyCDN, MaxCDN, and CloudFlare to fix the “parallelize downloads across hostnames” warning. However, almost all CDN providers now support HTTP/2 in which domain sharding is not recommended. And you can still serve assets from a CDN via HTTPS even if you haven’t migrated your WordPress site yet to HTTPS.

السبت، 28 أبريل 2018


How to Automatically Post to Facebook From WordPress

In today’s internet, the channels by which you can connect to your customers are very diverse and we don’t see that changing any time soon. One of the best ways of reducing this burden of updating and managing various channels is to AUTOMATE as much of the work as possible.
So today we are going to look at connecting your Facebook account to WordPress.         


First to define terms, there are two types of connections between WordPress and Facebook:
First there are feed updates.  These are simply items from your Facebook feed displayed on your website. They reflect your Facebook activity on your website. These are NOT the type of connections that we are discussing.
Second there are WordPress – Facebook publishing connections. This is a connection that takes your latest WordPress blog or post and publishes it on Facebook. The content is driven from your website rather than from Facebook. This is exactly the type of connection we shall be exploring.

A Reminder

Now before we start, some will say that you should not use third party services or connections to drive your Facebook content. This is mainly related to an article that was published back in 2011, stating that Facebook was penalising posts from third party apps. Things have changed since then and Facebook has publicly stated that they were dealing with this problem. However, we don’t advise simply automating your Facebook and then forgetting about it. Social media is all about interaction and nothing can replace that human interface. But you can reduce a lot of the strain and simply ensure that you are interacting with customers when they post to your feed or ask questions.
Ok so let’s get started…

1. JETPACK

Firstly, lets look at WordPress’ native method. WordPress has created a plugin called Jetpack. This comes with a number of different features, such as image optimization etc. But one of those features is Publicize, which will auto post to your social media. To use Jetpack you first need to create a WordPress.com account, but once that is set up you can then post your blog posts to the following social media accounts:
Facebook, Twitter, LinkedIn, Tumblr, Path and Google+. 
This is a reliable service and has native WordPress support. It justifiably, is a popular plugin. There are a number of limitations though. It will only work for Admin, Editior and Author user profiles.  If you are a contributor to a blog, it wont work for that. It also only works for new posts and that have never been published before. Post are only posted to your social media accounts when the posts are made public on WordPress. Draft posts cannot be published. Plus your post will be published to all the connected social media feeds at the same time.  You cannot schedule your social media posts. Though if your post is scheduled on WordPress, Publicize will still work and your post will go across when your post appears on WordPress.
Cost: FREE


2. IFTTT

We love IFTTT! It is one of our favourite methods for posting to Facebook from WordPress. It is a great tool for connecting many services together. IFTTT stands for “If this then that”.  It’s very easy to use and consumer focused. IFTTT lists 131 different connections you can create between WordPress and Facebook.
IFTTT works by setting a trigger and then an action.  In IFTTT these connections are called Recipes. So for example, a trigger could be “When you publish a new post on WordPress”. Then you set your action. Now IFTTT covers way more than just Facebook, but for the purposes of this blog, we’ll concentrate on Facebook. So an action could be “Post to Facebook Page”.
Not only can you automatically post your WordPress blog to your Facebook page, you can reverse it and post Facebook updates to your website. It is definitely worth taking a look at this method. Here is the list of possibilities between WordPress and Facebook.
One advantage with this method is that it does not require any additional plugins, so that’s one less plugin to remember to update. Excellent!
Cost: Free plan available


3. ZAPIER

Zapier is very similar to IFTTT, but is more focused on the business end than IFTTT. Think of it as the IFTTT for business. Zapier has over 500 different app connections available and many of them are business focused. In Zapier these connections are referred to as Zaps.
The principle is the same however: set up a trigger and an action. You can also set a chain of actions, so that one action becomes a trigger for a second action. Then the options become almost endless. Currently on the free plan you can have 5 Zaps and they sync every 15 minutes. This is certainly more than enough to sync your WordPress to Facebook.
At WP Hero we use Zapier for a number of different activities and we would happily recommend their service. Again no plugins are required to get Zapping.
Cost: Free Plan Available

Third Party Plugins

Now we come to third party WordPress Plugins, which has been the traditional way of connecting WordPress to Facebook. There are a plethora of plugins available with varying features. Some better than others of course. Some free, some paid. It would be impossible to list them all, so we will mention the one that we think is the best free one currently available, and that honour goes to…

4. NEXTSCRIPTS

Nextscripts is great, it will automatically publish to all of your social media accounts. You can also use it to repost previously published content at certain intervals, thus covering periods of inactivity. Another feature is that you can use it to send out a broadcast message to be published on social media. This can be anything, like the announcement of a new service or product.
When posting your content the plugin will automatically grab the post title, URL and featured image and include that info in the social media post. Another awesome feature is that you can create a custom social media message, such as a tweet for each post you publish on your blog.
There is a setup process, but they provide an excellent guide to help you. The plugin also makes 100% white labeled posts, meaning the posts will look as if you posted them directly – no “shared via NextScripts.com or posted by SNAP for WordPress” messages.
Did I mention that it’s also FREE!? Definitely one of the better plugins for automating your WordPress.
Cost: Free
So that’s our 4 recommended methods of publishing from WordPress to Facebook. Do you have any other suggestions? Then please share your thoughts in the comments below.

Bonus Tip

But before I go there is one other service that deserves a mention in the context of WordPress and Facebook, and that is Buffer. Buffer is a queuing service for social media. Basically you send your posts to Buffer, which in turn creates a queue of content. This might be Instagram posts, blogs, photos etc. You then set a posting schedule in Buffer for each social profile.  So for instance you could post to Facebook once per day and Twitter twice per day. The beauty of this is that you create a drip feed effect in your social media accounts, rather than a content explosion every time you upload your blog. So our recomended process for updating your Facebook actually looks like this…
WP Hero specialises in making your life easy. We maintain your WordPress site and specialise in automating regular WordPess content updates. Give us a shout to automate your site.

Making your website multi-regional using top-level domains


Hi there. My name is Nicolas Mondollot, I am the CTO of Drivy — an awesomepeer-to-peer car rental service. We launched our german website in early 2015. Here are some things we learned along the way.

When you start a website you usually start small: one website, hosted on one domain, targeting one country and one language. Simple, right?
Then, one day you decide to go international (exciting!). One problem, though: people don’t all speak/read the same language everywhere. You mustlocalize you content in multiple languages.
The standardized way to do so is to use a locale for each language and geographical region you are targeting. For instance if you want to make your website available in the US, France and Canada you’ll need 4 locales:
  • en : English (US)
  • fr : French (France)
  • fr-CA : French (Canada)
  • en-CA : English (Canada)
side note: this is a ‘pragmatic’ approach to locale naming, where we drop the regional part when it is not needed (more information here).
Great. Now, how do you make your website available in all these locales?

Locales and URLs

The first rule of Search Engine Optimization when you go international is: the locale must appear in the URL. Google suggests choosing among several options:
  • URL parameters: example.com?locale=fr
  • Subdirectories with a generic top-level domain (gTLD): example.com/fr/
  • Subdomains with a generic top-level domain (gTLD): fr.example.com
  • Country-specific top-level domains (ccTLD): example.fr
There is no one-size-fits-all approach. The best solution really depends on your specific requirements (this article from Moz may give you some pointers). At Drivy we decided to use ccTLDs because it was the best solution SEO-wise to target different countries. Plus it’s prettier.

First implementation

In Rails this is pretty straightforward. You just need to point your new domain DNS to your application server and drop this code in your ApplicationController (inspired by the official Rails guide):
class ApplicationController < ActionController::Base
before_action :set_locale
def set_locale
I18n.locale = request.host.split('.').last || :en
end
end
We basically take the last part of the URL domain (fr in the case of example.fr) and we set the locale to this value. Simple.
It works, but it has major drawbacks:
  • it doesn’t work for ccTLDs that don’t correspond to a valid locale (e.g. example.ca)
  • it doesn’t work with second-level domains (e.g. example.co.uk)
  • it doesn’t work in dev environment (where you usually use http://localhost:3000)
One other thing that may cause trouble down the road: what if you can’t map a ccTLD to a given locale? This can happen in several scenarios:
  • the ccTLD is already taken by somebody else — in which case the next best solution is to use a subdomain
  • you want to offer several locales for a given ccTLD (e.g. French and English for Canada)
And this gets even more complex as you add different environments (production, staging, dev) and more subdomains.
There must be a more robust way.

Second implementation

Let’s be more explicit and define a clear one-to-one mapping between the locale and the host:
HOSTS_MAPPING = {
'en' => 'example.com',
'fr' => 'example.fr',
'fr-CA' => 'fr.example.ca',
'en-CA' => 'en.example.ca'
}
Now let’s use this new mapping in our ApplicationController:
class ApplicationController < ActionController::Base
before_action :set_locale
def set_locale
I18n.locale = HOSTS_MAPPING.invert[request.host] || I18n.default_locale
end
end
We can now easily make this work in our staging environment by using a different hash:
HOSTS_MAPPING_STAGING = {
'en' => 'staging.example.com',
'fr' => 'staging.example.fr',
'fr-CA' => 'fr.staging.example.ca',
'en-CA' => 'en.staging.example.ca'
}
side note: this breaks dev/prod parity, so you should probably avoid this and instead buy a dedicated domain for your staging environment
Same thing for our dev environment:
HOSTS_MAPPING_DEV = {
'en' => 'dev-example.com',
'fr' => 'dev-example.fr',
'fr-CA' => 'fr.dev-example.ca',
'en-CA' => 'en.dev-example.ca'
}
side note: this means every member of your dev team must setup his etc/hosts to make all the domains above point to his/her local machine

One major gotcha: emails

Our implementation works pretty well and is pretty flexible. But there is one big gotcha: what host do we use when we send emails to our users?
The first solution that comes to mind is to use the default host and then redirect the user based on his latest locale:
One big problem: although it is easy to share cookies across subdomains, it’s impossible to share cookies across top-level domains. And since server-side sessions are usually based on cookies this means you cannot have proper sessions across all your domains — unless you implement some kind of OAuth mechanism, which isn’t trivial.
If one our your users signs in on your French website (example.fr) he won’t be signed in on example.com, which means you won’t be able to retrieve his locale and you won’t be able to automatically redirect him to the correct domain. Bummer.
One solution is to use the correct domain in your emails. But since we are sending emails asynchronously we can’t rely on the request object like we did previously inside our ApplicationController.
We can work around this by hacking ActionMailer a bit:
class MyMailer < ActionMailer::Base
def welcome(user)
@user = user
mail(to: user.email)
end
def url_options
super.merge({host: HOSTS_MAPPING[@user.locale]})
end
end
We retrieve the user’s locale (stored in our database) and we set the default host dynamically. All the links present in the email will use the correct host. It works!

More gotchas?

A few other gotchas to be aware of:
  • You must set up multiple analytics accounts, one for each domain.
  • You must buy a multi-domain SSL certificate (unless you are ok with managing one certificate per domain). If you want to secure multiple domains AND multiple subdomains things can get very expensive very quickly. At Drivy we chose to use a GeoTrust True BusinessID certificate because it is possible to add up to 25 domains or subdomains for a reasonable price: around €300 for a 5-domain pack, plus €20 per additional domain. This is still very expensive, but there aren’t a lot of alternatives apparently.
  • Your SEO juice will be split between your domains — there is no cumulative effect. If you open a new country you will start from zero SEO-wise. One way to mitigate this is to use alternate hreflang.

Despite all the efforts and all the gotchas I am pretty happy about the way it turned out for Drivy. Top-level domains really are a great strategy for the long term as it gives you clean URLs and a strong branding in each country.
If you are unsure about the strategy you want to adopt I really recommend reading this article from Moz as it will give you concrete pointers.
Happy internationalization!

This article is part of the publication Unexpected Token powered by eFounders — startup studio. All eFounders’ startups are built by extraordinary CTOs. If you feel like it could be you, apply here.
بث مباشر

البث المباشرة مع رغيب أمين للإجابة على تساؤلاتكم التقنية من الإثنين إلى الخميس

730

بتوقيت غرينيتش

2230

بتوقيت مكة المكرمة

المحترف: شروحات برامج مكتوبة ومصورة بالفيديو  | Almohtarif
المحترف عبارة عن مدونة ضخمة تضم عدد كبير من الفيديوهات المصورة عن طريق حلقات متسلسلة نتطرق فيها إلى مختلف المواضيع التقنية القريبة من الشباب العربي ، بالإضافة إلى مقالات . مدونة المحترف تأسست سنة 2010 حيث تستقطب الآن عدد كبير من الزوار من كافة ربوع الوطن العربي ، حيث ان مقرها الرئيسي بالمغرب و مديرها امين رغيب ،حاصلة على جائزة افضل مدونة مغربية لسنة 2012 / 2013 ومصنفة ضمن افضل 10 مدونات عربية حسب المركز الدولي للصحفيين ICFJ سنة 2013 وحاصلة على الجائزة الفضية من يوتوب (اول قناة مغربية تحصل على هذه الجائزة من يوتوب ) سنة 2014 وتم تكريم مؤسسها من طرف حاكم دبي بجائزة رواد التواصل الإجتماعي عن فئة التكنولوجيا سنة 2015 وهو الموقع التقني الاول في المغرب والعالم العربي
للإتصال بنا: contact@almohtarif.net
جميع الحقوق محفوظة ل الربح من الانترنت | Make Money
صمم وكود بكل من طرف